Are you an aspiring musician, podcaster, voice-over artist, or a content creator with a burning desire to bring your ideas to life? The idea of building a professional studio may seem daunting, expensive, and out of reach. But what if I asked you to help me get started? Needless to say you don’t need a million-dollar budget or a dedicated soundproof room to get started? Welcome to the wonderful world of the home studio, where creativity meets affordability.
Creating a home studio isn’t just about the equipment; it’s about creating a space that inspires you. It’s a haven where you can experiment, make mistakes, learn, and grow as an artist. You can. This blog post is a roadmap for the exciting journey of building your own creative hub, even if you’re starting from scratch.
Why a Home Studio is Your Secret Weapon
In today’s digital age, the barriers to entry for content creation have never been lower. A home studio gives you:
Freedom: Record whenever inspiration strikes, whether it’s 2 AM or 2 PM. No need to book expensive studio time or adhere to someone else’s schedule.
Control: You have complete creative control over your projects, from the recording process to the final mix.
Cost-Effectiveness: Invest in a few key pieces of equipment once, and you have a studio that’s ready to go whenever you are.
Skill Development: Building a studio forces you to learn about audio engineering, mixing, and mastering, invaluable skills that will elevate your work.
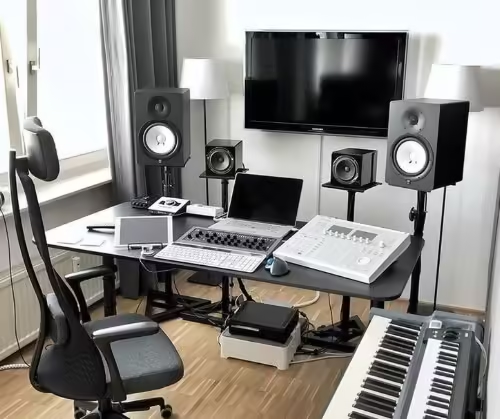
The Core Components: What You Really Need to Start
Forget the fancy gear for now. A successful home studio for a beginner is all about the essentials. Here’s a breakdown of the core components you’ll need:
1. The Brains of the Operation: Your Computer
This is the heart of your studio. You don’t need the latest and greatest gaming PC. Any modern laptop or desktop with a decent processor (Intel i5 or equivalent) and at least 8GB of RAM will work.
Pro Tip: Clear some storage space! Audio files can be large, so an external hard drive is a great investment down the line.
2. The Sound Hub: An Audio Interface
This little box is your translator. It takes the analog signal from your microphone or instrument and converts it into a digital signal your computer can understand.
It also acts as your headphone and monitor amplifier, allowing you to hear your recordings with clarity. Look for a simple 2-in/2-out interface from brands like Focusrite, PreSonus, or Universal Audio.
3. Capturing the Magic: Your Microphone
The microphone is your ears. For beginners, a large-diaphragm condenser microphone is a fantastic all-rounder. It’s sensitive enough to capture vocals, acoustic instruments, and even the subtle nuances of speech for podcasts.
Brands like Rode, Audio-Technica, and sE Electronics offer excellent starter options. Don’t forget a pop filter to prevent those harsh “P” sounds!
4. The Software: Digital Audio Workstation (DAW)
This is where the magic happens. A DAW is a software program that allows you to record, edit, mix, and produce music or audio.
Many audio interfaces come bundled with a “lite” version of a popular DAW like Ableton Live, Pro Tools, or Cubase. Other great options include Audacity (free!) or GarageBand (for Mac users).
The key is to pick one and stick with it. Learning one DAW inside and out is far more productive than dabbling in several.
5. Hearing It All: Headphones or Studio Monitors
Initially, a good pair of studio headphones will be your best friend. They give you an accurate representation of your sound without being affected by the acoustics of your room. Look for “closed-back” headphones for recording to prevent sound from leaking into the microphone.
As you progress, you might want to invest in a pair of studio monitors (speakers) to get a broader perspective of your mix. Brands like KRK, JBL, and Yamaha are staples in the industry.
Your First Steps into the Studio World
Find Your Space: You don’t need a soundproofed room. A quiet corner in a bedroom or a small closet can be a great starting point.
Acoustic Treatment: This is a game-changer. You can dramatically improve your sound quality by simply hanging blankets, duvets, or foam panels to absorb reflections.
Watch and Learn: YouTube is a treasure trove of tutorials. Search for “DAW for beginners,” “how to use an audio interface,” or “home studio setup.”
Just Start: Don’t get caught up in “analysis paralysis.” The best way to learn is by doing. Set up your gear, press record, and create something!
Building a home studio is an exhilarating journey of discovery and creativity. It’s your personal playground, a space where you can turn your ideas into reality. Start with the essentials, and let your passion guide you. The world is waiting to hear what you have to say. Happy creating!